Image Morphing
1. Introduction
This guide explains how to create a morphing effect using two still images with the RE:Flex plugin for After Effects. Instructions for installing RE:Flex are provided in Section 3.2 of “Morphing Part 1.”
2. Preparing the Materials
2.1 Downloading Materials
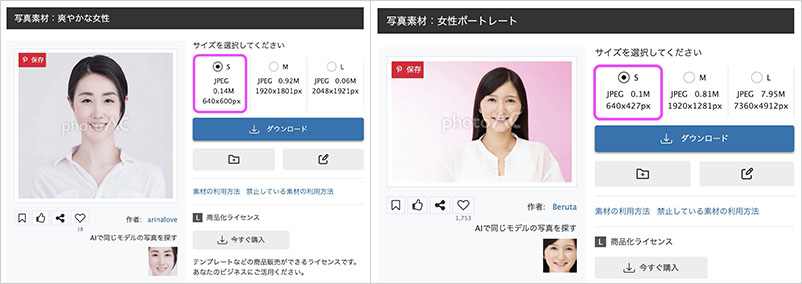
Use images from the photo stock site photoAC. With a free account, you can only download S-size images. Download the two images of women from the URL below.
2.2 Material Processing
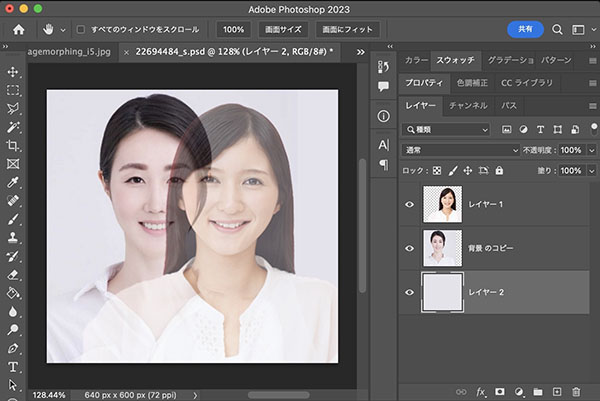
Adjust the images in Photoshop so they are the same size and in the same position, then save them as two separate files. Edit the background so it is the same color.
3. Preparing for the Project
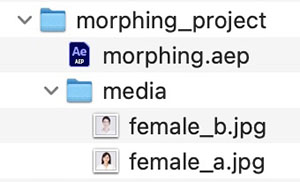
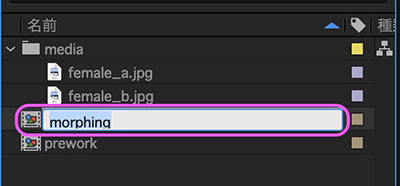
Organize your folders as shown below, and place the two images in the “media” folder. Save the After Effects project (morphing.aep; you can name it whatever you like) in the root directory.
4. RE: Flex Morph
4.1 Creating the First Composition
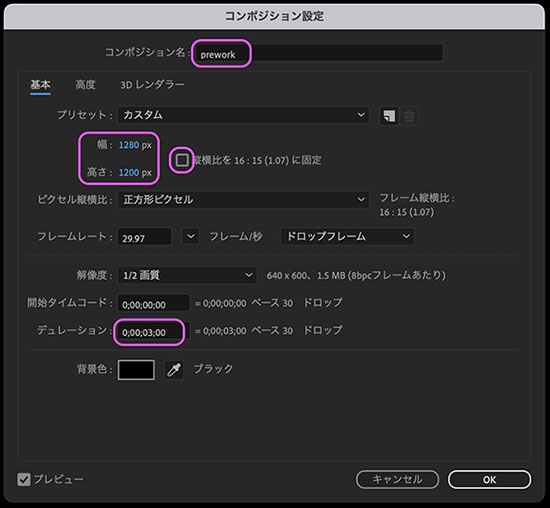
The image we have prepared is 640 x 600 pixels, but we will artificially double the resolution to make the RE:Flex demo display smaller. Create a composition using the following settings.
Composition Name: prework Width: 1280px Height: 1200px *Uncheck the “Lock aspect ratio” box Duration: 3:00
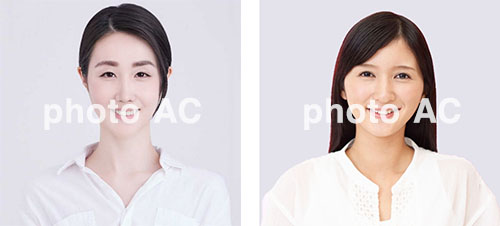
Add “female_a.jpg” and “female_b.jpg” from the Project Panel to the timeline. Change the scale of each to 200%. Change the duration of the “female_b.jpg” layer to 1 frame (0:00–0:01). Change the duration of the “female_a.jpg” layer to 1 frame (2:29–3:00).

4.2 Creating a Second Composition (Nesting)
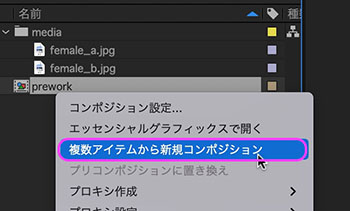
Right-click the “prework” composition and select “Create New Composition from Multiple Items.”
A new prework2 file is created, inheriting the settings (size and duration) from prework. The prework layer is automatically added to the prework2 layer.
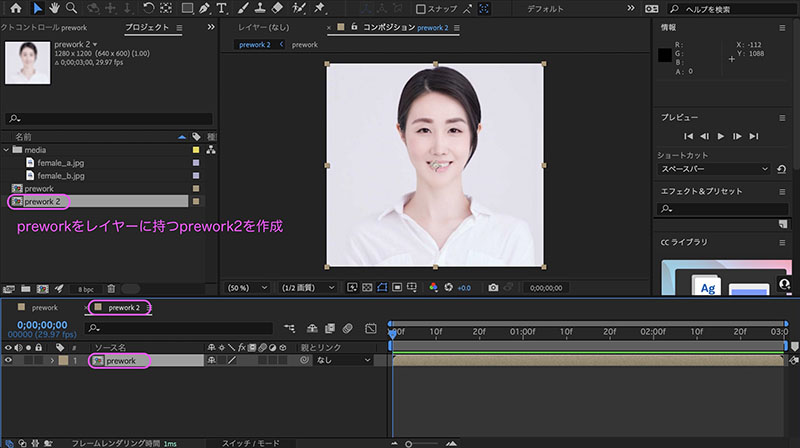
In the Project panel, rename “prework2” to “morphing.” With the composition selected, press the Return key to enter name input mode, then press Return again to confirm the change.
4.3 Applying RE:Flex Morph
With the prework layer selected in the timeline, go to the Effects menu > RE:Vision Plug-ins > RE:Flex Morph and apply the effect.
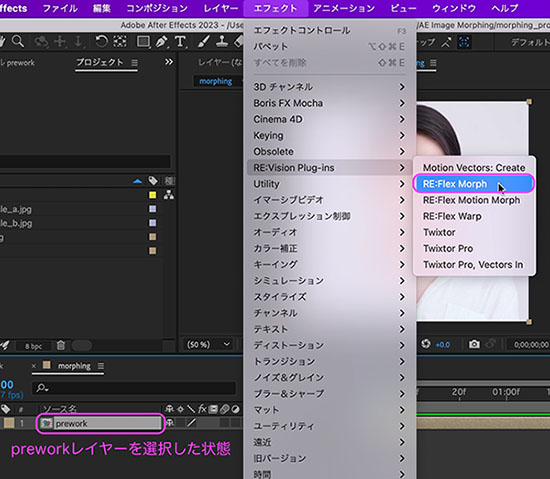
The top-left corner of the UI switches to the Effects Control panel, displaying the RE:Flex Morph parameters. An “X” appears in the Composition panel to indicate demo mode.
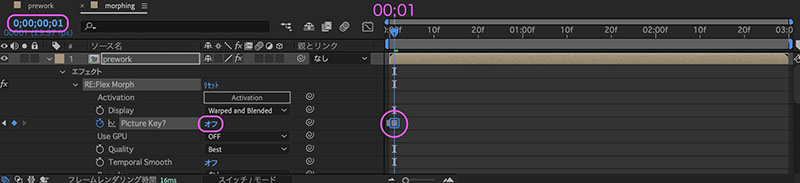
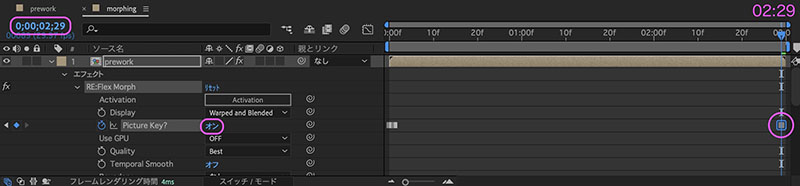
4.4 Configuring the Picture Key
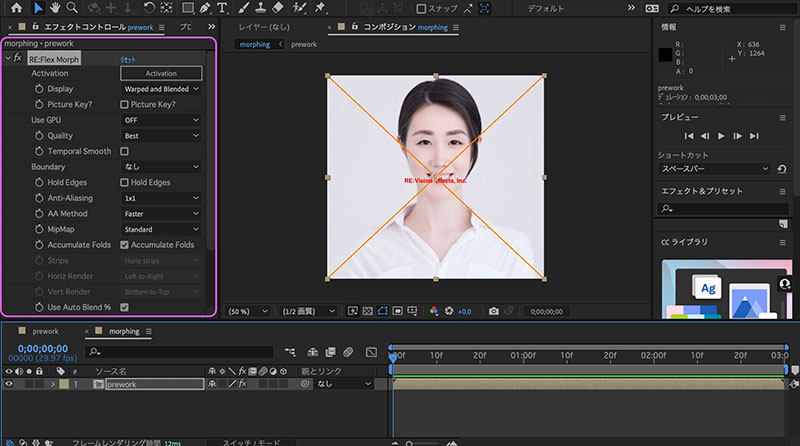
RE: Flex Morph has its own specific procedure; configure it as follows.
Click the stopwatch icon to enable the Picture Key keyframe. Turn on the Picture Key at frame 00:00.
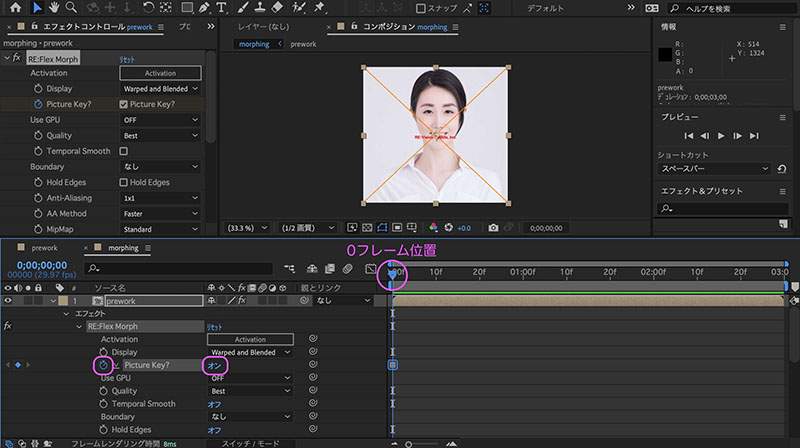
Turn off the Picture Key at frame 00:01.
Turn on Picture Key at frame 02:29.
5. Creating an Open Path
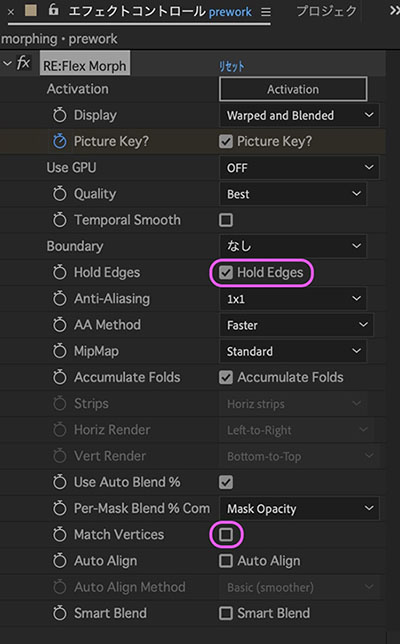
5.1 Configuring Parameters
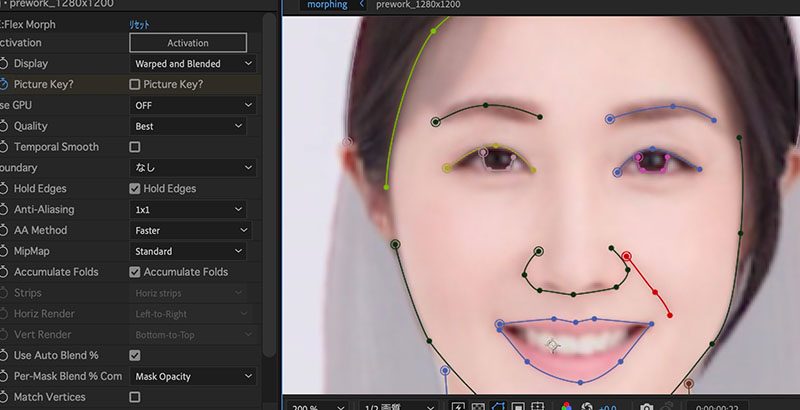
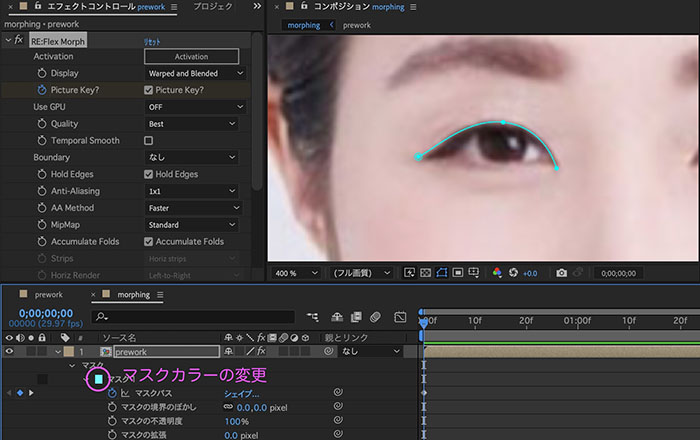
RE:Flex Morph has several parameters. Here, we will configure only the following two.
- Hold Edges: Check this box (to retain the rectangles in the image)
- Match Vertices: Uncheck this box (to analyze the shape of the path without analyzing the number or position of the control points in the mask path)
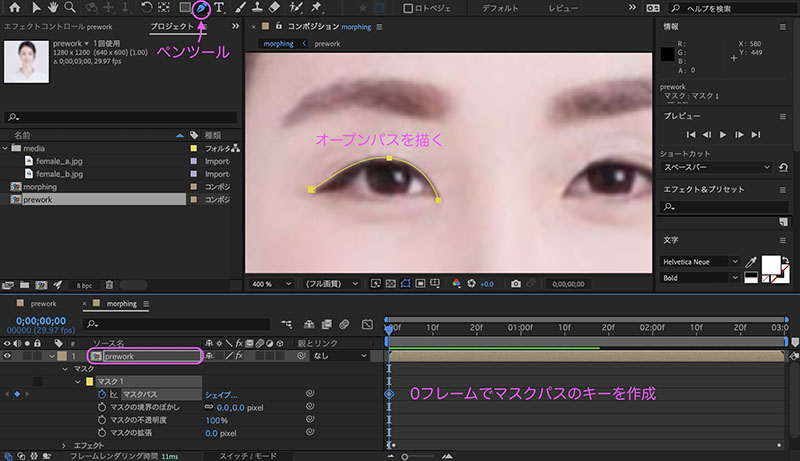
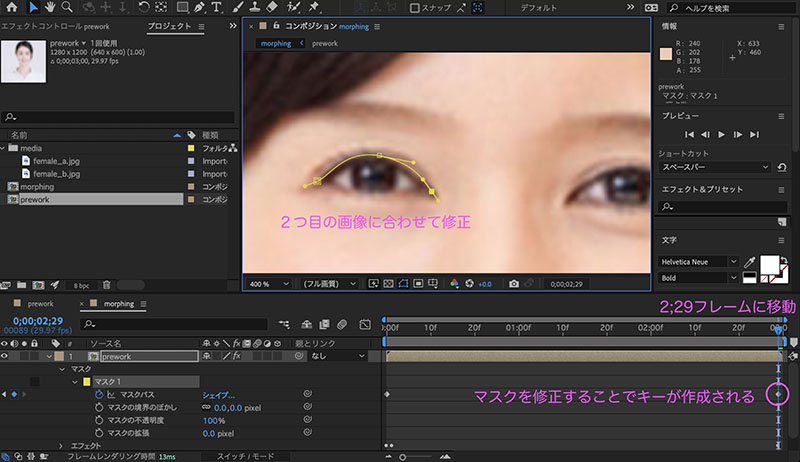
5.2 Drawing the Upper Eyelid Line on the Right Eye
Follow the steps below.
- Move to frame 0
- Select “prework” in the Timeline
- Select the Pen Tool and draw an open path in the Composition panel along the upper eyelid of the right eye
- Turn on the stopwatch icon for the Mask Path in the Mask Parameters (to create a keyframe)
- Jump to the 2:29 mark
- Switch to the Selection tool and adjust the path in the Composition panel to match the image
Drag the time indicator or play the preview to see how the two images change in response to the path transformation.
5.3 Changing Mask Colors and Names
If the mask color is difficult to distinguish because it is similar to the color in the image, you may change the mask color as needed.
You may rename the mask for clarity. Select the mask name, press the Return key to rename it, and then press the Return key again to confirm.
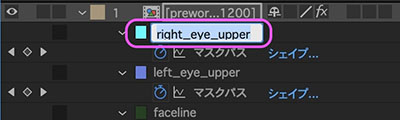
5.4 The Pupil of the Right Eye
If left as is, the change in the pupils will appear as a dissolve; however, if you draw a path around the pupils, the system will process it so that the pupils appear to move and change.
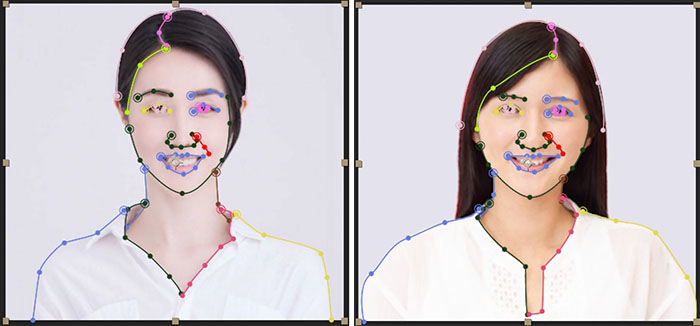
5.5 Paths Around the Face
Create paths for the eyes, nose, mouth, facial contours, head, and other features. For the second woman, her hair overlaps her right eyebrow, so if you simply define the hair’s edge as a path, the right eyebrow will not align properly. You’ll need to rely on the dissolve effect to some extent. If you want to achieve morphing based solely on the movement of the hair, you’ll need to create a pre-processed animation for the second woman only.
5.6 Paths Around Clothing
If the clothing does not have the same structure, create paths with morphing in mind—treating it strictly as fiction. Create morphing effects that align with the scene’s direction, such as making the visual changes interesting or ensuring they feel natural within the scene.
5.7 Number of Required Paths
It’s up to you how many passes you add. You’ll get the hang of it as you experiment and create. Since the women in this project have different hairstyles, there are limits to what can be achieved with morphing alone. For example, for movements like letting hair down, it’s better to create a separate pseudo-animation or prepare the footage during the shooting phase.
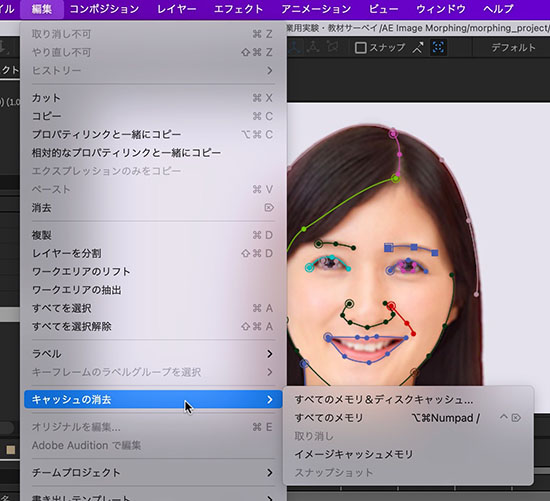
6. Disk Cache and Media Cache
6.1 What Is a Disk Cache?
(For reference)
6.2 Clearing the Disk Cache
Since the disk cache is enabled by default, it will accumulate to over 100 GB if left unchecked. Once the disk reaches its capacity limit, your PC will slow down significantly, so you need to either reduce the disk cache size or delete it. For professional use, such as running After Effects or Premiere smoothly, you may also need to set up a separate disk dedicated to the cache.
7. Exporting MP4 Files (Assignment)
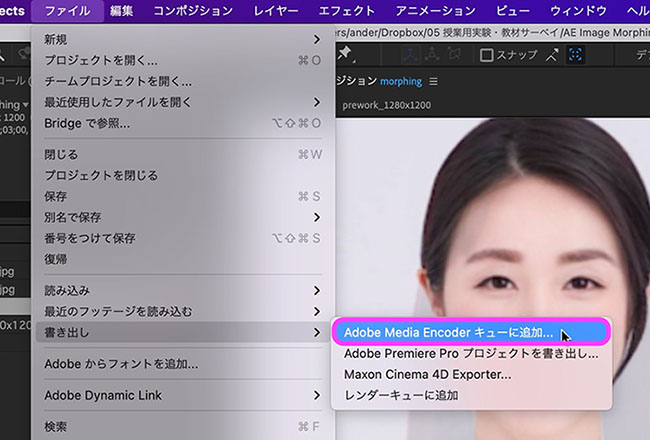
Click File > Export > Add to Adobe Media Encoder Queue.
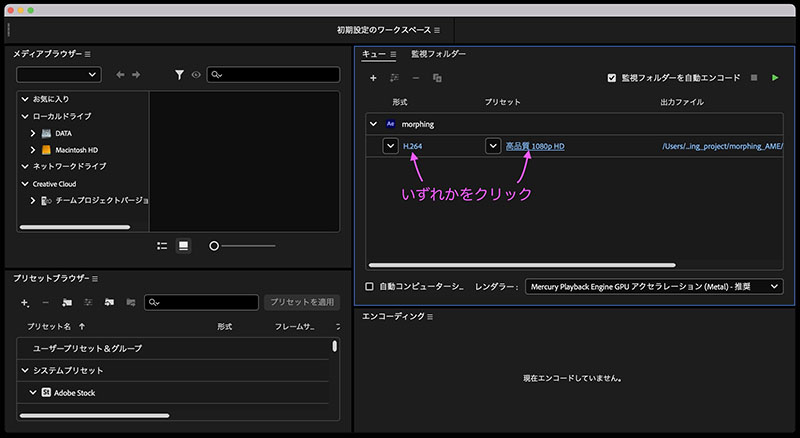
Click the area shown below in the Media Encoder queue.
In the Export Settings dialog, uncheck the “Use default aspect ratio” option under Basic Video Settings, then change the resolution to 1280px x 1200px.
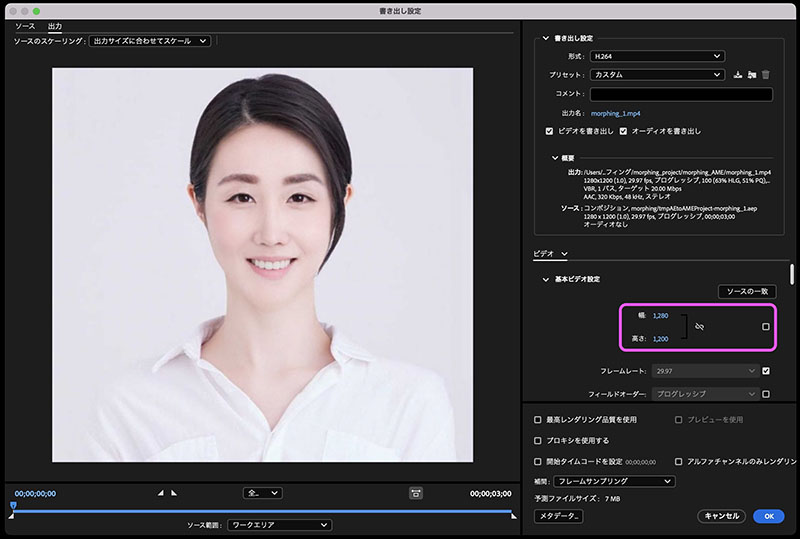
After clicking “OK” in the figure above, start the queue and begin rendering.