Premiere Pro Part 2
1. Editing Style
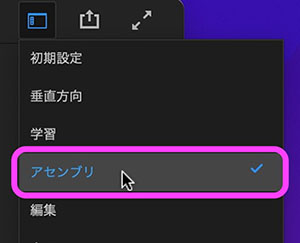
1.1 Systematic Editing (Assembly)
In professional-level video production for film, TV, and other media, by the time the shooting script is finalized based on the screenplay, it is already determined what will be filmed on set. On set, lists essential for editing—such as which scenes were shot and how many takes were recorded, as well as which takes were approved and which are backup candidates—are recorded.Rather than having to search for these details from scratch during the editing phase, the editing process proceeds based on these lists. In this case, since the IN and OUT points of the raw footage are largely predetermined, a systematic editing approach like the one described below is appropriate.
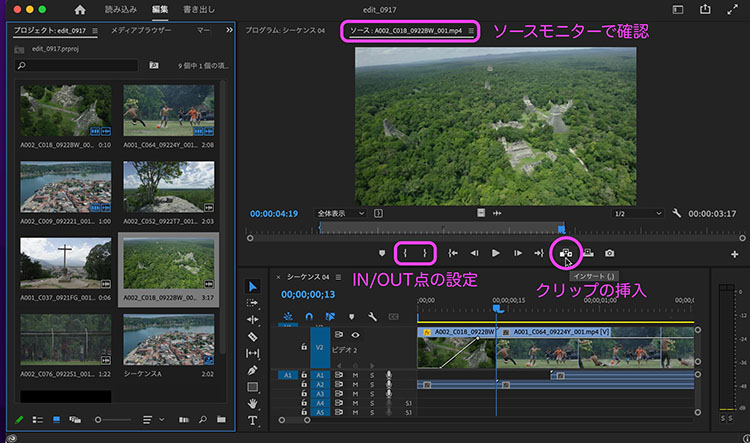
Switch the workspace to Assembly mode, set the IN and OUT points while checking the Source Monitor, and insert clips into the timeline. Once the assembly is complete, proceed with fine-tuning the timing and editing transitions, effects, audio, and other elements.
1.2 Casual Filming and Editing
Beginners don’t need to follow the systematic workflow described above. Instead, I encourage you to experiment through trial and error to discover your own shooting and editing styles. You’ll naturally develop efficient methods along the way.
With raw footage shot in a casual style, only the camera operator or staff familiar with the on-site situation know exactly what was captured in each shot, and they often forget the details by the time editing begins. In such cases, the process usually starts by randomly arranging clips on the timeline and playing them back.
From here on, I’ll explain things in a somewhat informal style.
2. Placing Clips on the Timeline
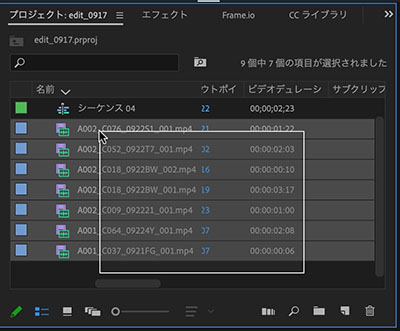
Select the clips you need in the Project panel. To select multiple clips, drag from an empty area of the panel to create a selection. If there are many clips, use the SHIFT or OPTION key to select them.
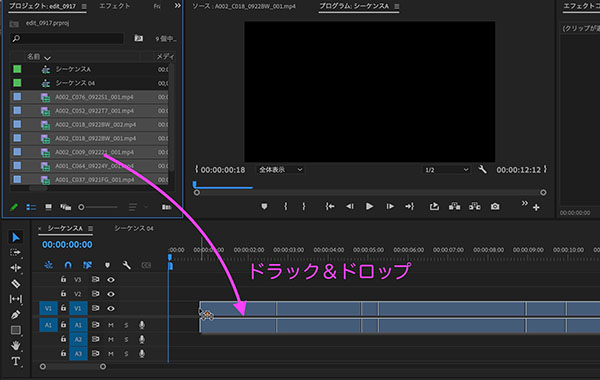
Drag and drop the clip selected in the Project panel onto Track V1 of the timeline.
3. Working with the Timeline
3.1 Time Indicators
You can move the playback position by dragging the time indicator.
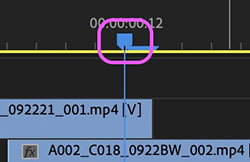
When you zoom in on the timeline, a bar appears to the right of the time indicator icon. The time indicator is positioned at the start of the frame, and on the last frame of a clip, it indicates that the next clip will be displayed.

3.2 Timecode
The timecode is displayed in the upper-left corner of the Timeline panel and the lower-right corner of the Program/Source Monitor. The timecode indicates the time at the current playback position. You can click it to enter a value directly. Entering a value such as +10 will move the playback 10 frames forward.
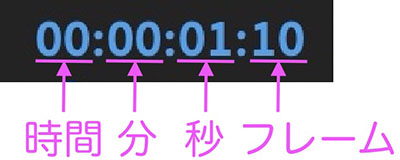
The smallest unit of video timecode is the frame, and this depends on the sequence settings. You need to decide which video format to use based on the specific requirements of your project.
Although frame rates of 60 fps or higher have become possible in recent years, 29.97 fps is still used in broadcasting and on DVDs. While 29.97 fps is sometimes referred to as 30 fps for convenience, it is important to note that 29.97 fps (drop-frame) and 30 fps (non-drop-frame) are strictly speaking different.
(Reference) The Difference Between Drop Frames and Non-Drop Frames
3.3 Playing/Pausing the Timeline
Use the spacebar to toggle play/pause. You can also use the icon below the monitor panel.
If you want to play back a specific section repeatedly to check it, the standard method is to move the cursor (time indicator) to the playback start position, press the spacebar to play and stop, and then left-click to return the time indicator to the playback start position.

You can also perform the following operations using the keyboard.
Left/Right Arrow Keys: Move 1 frame (Move 10 frames when held down with SHIFT) Up/Down Arrow Keys: Move to clip boundary
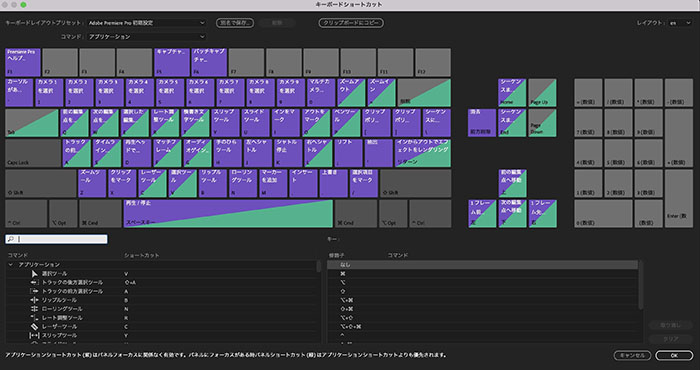
3.4 Checking Keyboard Shortcuts
You can check this under Premiere Pro Menu > Keyboard Shortcuts. Pressing the SHIFT or Cmd key will toggle the view to show the state of that key when pressed.
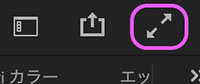
3.5 Full-Screen Display
The icon in the upper-right corner of the UI (see below) allows you to play the monitor feed in full-screen mode.
3.6 Scaling and Moving the Timeline
You can change the scale of the timeline by dragging the end of the bar at the bottom of the timeline. The keyboard shortcut is OPTION + mouse wheel.
Drag the bar near the center of the timeline left or right to scroll the timeline horizontally. The keyboard shortcut is Shift or Cmd + mouse wheel.
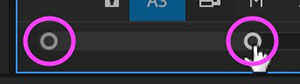
3.7 Setting IN and OUT Points (Export Range, Lift, Extraction)
You can specify the IN and OUT points using the icons below the monitor. The IN and OUT points of a sequence can be used to define the export range, lift, extraction, and preview playback range.
You can also set the export range in the work area.
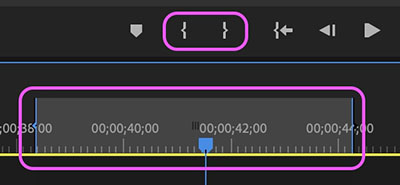
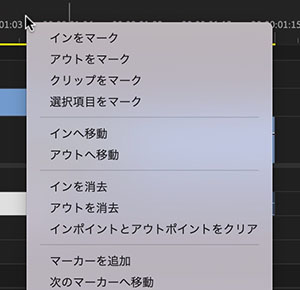
You can also set clear and mark points for IN and OUT points using the context menu that appears when you right-click near the timecode scale at the top of the timeline.
4. Operating the Truck
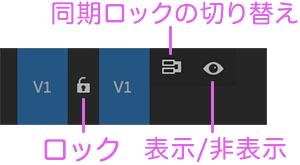
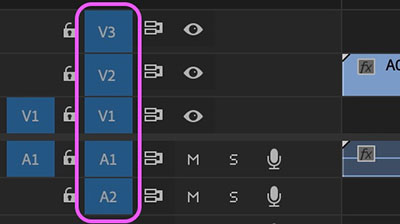
4.1 Locking, Showing/Hiding, and Toggling Sync Lock on Video Tracks
- Key icon: Lock track
- Eye icon: Show/Hide
- Sync Lock toggle icon (not necessary for beginners): For example, to prevent audio tracks from being affected when inserting a video track (see reference below)
(Reference) YouTube - [Premiere Pro] Did You Know? How to Use “Toggle Sync Lock”
4.2 Source Code Patches (Not for Beginners)
The leftmost section of the track is where clips are inserted into the selected track. In the Source Patch, you can select only one video track and one audio track.
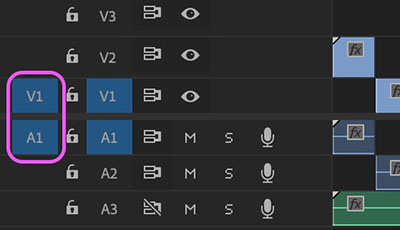
For example, if you turn on only the V1 track and leave all audio tracks turned off, only the video tracks will be loaded, even for clips that contain audio tracks. However, this setting does not apply when multiple clips are selected. In that case, you’ll have to unlink the clips and delete only the audio tracks.
(Reference)
- Source Patches and Track Targets
- A Must-See for Beginners! How to Use Premiere Pro’s Handy Cut Tools! Boost Your Efficiency with 3 Types of Cuts!?
4.3 Track Targets (Not for Beginners)
Turning on track targeting allows you to limit the range of your controls. Until you get used to it, keep everything either on or off.
- Cursor up/down keys: Move the point *Affects both video and audio tracks
- Add edit point (Cmd+K) *Only works when no clip is selected. If a clip is selected, the edit point is added only to the selected clip.
*There might be others as well
(Note) Starting with Version 2022, the behavior has changed, and the track target no longer affects the paste destination. By default, Cmd+V pastes the content onto the same track as the source.If you go to Keyboard Shortcuts > Commands > Panels > Timeline Panel and remove “Paste to Same Track,” the behavior will revert to that of previous versions. However, we do not recommend changing the default setting. You can also work around this by moving the source track before pasting. This specification change is likely intended to prevent confusion for beginners who might accidentally change the track target and end up pasting to an unintended track.
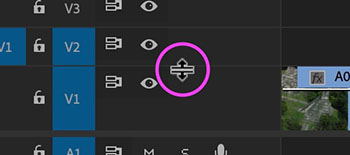
4.4 Scaling, Moving, and Adjusting the Viewport of Tracks
You can resize a single track by dragging the border near the track name. You can also do this by holding down the Option key and scrolling the mouse wheel while hovering over the track name. Hold down the Shift key and scroll the mouse wheel to scale the entire video or audio track.
You can scale multiple tracks at once by dragging the top or bottom edge of the video track area or audio track area on the right side of the Timeline panel. If the viewport is narrow, you can drag the middle of the bar to move it up or down.
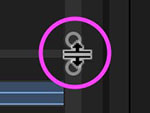
You can adjust the display area by dragging the boundary between the video track area and the audio track area up or down.
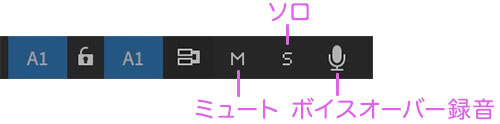
4.5 Muting, Soloing, and Voice-Over Recording for Audio Tracks
- Mute: Mute the track
- Solo: Mute all other tracks
- Voice-over recording: Used for recording narration, etc.
(Reference) Automatic audio ducking in Premiere Pro
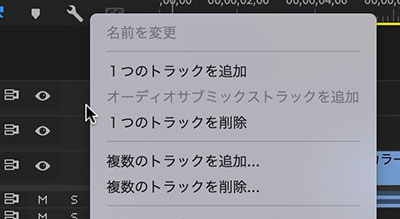
4.6 Adding and Removing Tracks
Do this using the menu that appears when you right-click near the icon on the left side of the track.
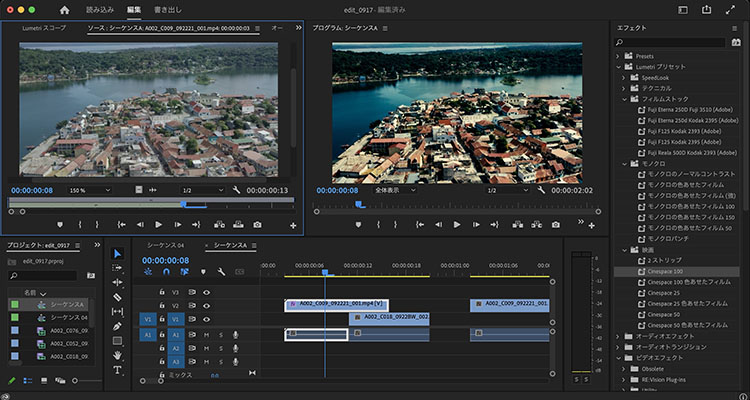
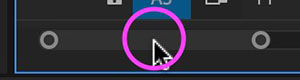
5. Program Monitor/Source Monitor (Introduction Only)
In the default workspace, the Source Monitor and Program Monitor are located within a single panel. They switch automatically when you perform the following operations.
- Switch to the Source Monitor: When you double-click a clip in the Project panel or on the Timeline
- Switch to the Program Monitor: When you play back a clip on the Timeline (sequence) or adjust the time indicator
To switch between the Source Monitor and Program Monitor manually, click the area shown in the figure below at the top of the monitor panel.

In the Effects Workspace and similar environments, displaying both the Source Monitor and the Program Monitor simultaneously allows you to adjust color grading while comparing the results with and without the effect applied.